Free Craft Ideas, Tutorials and Templates


CI Border

Home

Patterns

Tutorials

Spring Crafts

Summer Crafts

Fall Crafts

Christmas & Winter Crafts

New Crafts


Snowy Winter Village Christmas Card

This card is made using paper napkins and the card is in two layers. The inner layer with a complete paper napkin motif covering the card and a outer layer of acetate foil with the same motif created as a sticker and adhered to the acetate.


Snowy Village Card 1
They all settled down for a long winter’s nap!

For this project you will need:

- white square blank card
- sheet of acetate the identical size as the card
- paper napkin with winter village motif (the motif should be large enough to cover a card and at the same time have smaller
  motifs that can be cut out separately)
- fusible web
- iron
- parchment or baking paper (to protect iron when ironing)
- sheet of white double sided adhesive (should be thin like a sticker if possible, but not mandatory)
- blue satin ribbon
- clear glue
- white iridescent glitter

Instructions: (you will need two identical paper napkin quarters for this card)

1. Remove all but the top layer of two paper napkin quarters. Set one quarter aside. Using the second quarter, iron fusible web onto the backside of it. Use parchment or baking paper to protect your iron from the fusible web.
2. Remove the paper backing from the fusible web once the motif is cool. Iron now the fused motif onto the front of the paper card and trim down to the size of the card.
3. Fold the acetate in half just like the card. Place the acetate “card” exactly over the paper card. Secure the cards together by tying satin ribbon to the folded area of the cards.
4. To create a sticker with the remaining napkin quarter, here is what you have to do. Adhere the double sided adhesive to the backside of the napkin. (It does not have to cover the complete napkin, just the rough area you will be using. (Here we used the village motif found on the napkin). Cut the village now exactly out. Peel off the backing of the double sided adhesive and stick the village motif now on the acetate, exactly over the same village image which can be seen on the card. See picture below. You see that the village on the acetate will cover the village on the card when the card is closed.
5. Lightly outline the village rooftops and treetops on the acetate with clear glue and sprinkle iridescent glitter on the wet glue. Allow the card to dry before using.
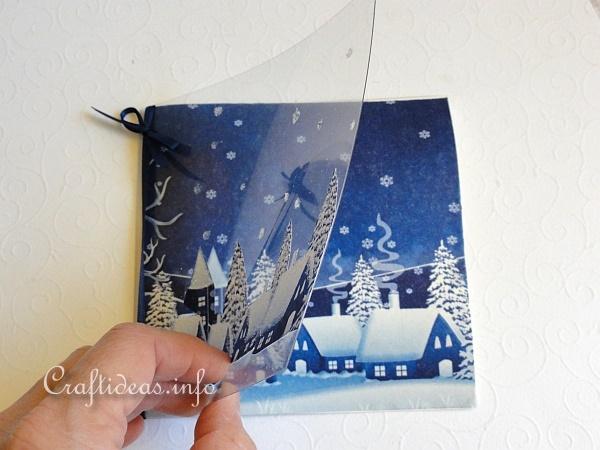
Snowy Village Card 2
Underneath the acetate is the background.

Illustrated Card Craft Tutorials:

Paper Napkin Applique with Fusible Web Tutorial

Paper Napkin Applique With Fusible Web Tutorial

Card Help

Tips, Tools and Techniques for Card Crafts and Paper Crafts


More Winter and Christmas Craft Themes:

Christmas and Winter Crafts for Kids

Christmas and Winter Paper Crafts

Christmas and Winter Textile Crafts

Christmas and Winter Wood Crafts

Christmas and Winter General Crafts

Christmas and Winter Greeting Cards

Christmas Tree Ornaments

Christmas and Holiday Wreaths

Christmas Craft Patterns

Santa Claus Crafts

Snowman Crafts

Advent Calendars

Gingerbread Crafts

Christmas Projects.com


More Christmas Cards and Winter Cards

Old World Santa Christmas Card

Teddy Bear Santa Christmas Card

Teddy Bears Christmas Card

Elegant Snowflakes in Winter Christmas Card

Silver Snowflakes Card

Set of Christmas Cards with Snowflake Motifs

Winter Town Christmas Card

Winter Snowflakes Christmas Card

Snow Greeting Card

Snowy Winter Village Christmas Card

Snowy Village Card


Copyright: Please read this Copyright Information about using the images of this website.


© Craftideas.info

Contact     Links     Privacy Policy and Cookies