Free Craft Ideas, Tutorials and Templates


CI Border

Home

Patterns

Tutorials

Spring Crafts

Summer Crafts

Fall Crafts

Christmas & Winter Crafts

New Crafts


Cute Clay Pot Pig

This little piggie went to the market... because he was all dressed up and needed somewhere to go. It is so much more fun going with friends, than being alone.  Kids can create barnyard companions such as cows, horses, sheep, chickens, roosters and goats to accompany him. The same basic technique gets used, and only the colors of the bodies and the ears and noses need to be changed, if necessary.


Spring Craft for Kids - Cute Clay Pot Pig Craft

For this project you will need:

- 35 mm styrofoam ball (approximately 1.4 inches)
- clay pot 40 mm high (approximately 1.6 inches high)
- pink construction paper or cardstock
- pink button
- 2 x 10mm wiggly eyes
- pink acrylic paint
- red paint, stiff round brush and piece of paper towel (for the cheeks)
- red checked ribbon
- red heart button or other button of choice
- strong craft glue
- kitchen knife (parental assistance required)

Tip: If parents wish to assist to speed up the crafting time, the eyes, nose, button and head may also be glued on using a hot glue gun.

Ages 9 and older
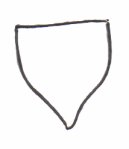
Pig Ear Template 150
Ear Template
(Right click on picture, save to a chosen folder and print to appropriate size)

Here is another cute project similar to this one so the pig has a playmate >>> Clay Pot Cow


Instructions:

1. First you must paint the styrofoam ball and the clay pot pink and let them dry.
2. Parents can help now by cutting 2 slits in the head to insert the ears at a later point.
3. Print out the ear template to the appropriate size and cut out 2 ear shapes out of the pink paper or cardstock and place a dab of glue on the flat ends and insert into the slits on the head.
4. Place 3 dots of glue on the styrofoam where the eyes and nose will be. Let the glue slightly dry and then press the wiggly eyes and button nose onto the glue.
5. To give the pig rosy cheeks, take the stiff round brush and dip it slightly in the red paint. Take the brush and dry it off on a piece of paper towel until almost all of the paint is gone. Then brush a circle shape onto the cheeks area.
6. Place glue on the clay pot and also some on the bottom of the styrofoam ball. Let the glue slightly dry. Press the pieces together and wait for the glue to completely dry.
7. Tie a ribbon around the neck of the pig and turn the bow to the side of the neck.
8. Glue a button on the front of the pig.


More Spring Season Craft Themes:

Spring and Easter Paper Crafts

Spring and Easter Wood Crafts

Spring and Easter Textile Crafts

Spring and Easter General Crafts

Spring and Easter Crafts for Kids

Spring Season Greeting Cards

Valentine’s Day Crafts

St. Patrick’s Day Crafts

Easter Crafts

Easter Chick Crafts

Decorating Easter Eggs

Easter Bunny Crafts

Mother’s Day Crafts

Spring Craft Patterns

Nature Crafts

More Spring Crafts for Kids:

Fun Foam Heart Refrigerator Magnets

Corrugated Cardboard Flower Table Decoration

Paper Mosaic Heart

Upcycled Lid Heart Suncatcher

Fuse Beads or Perler Beads Valentine’s Heart

Easy Flower Power Bookmarker

Clay Pot Cow

Felt Flower Plant Poke

Colorful Bookmarker

Clay Pot Pig

Spring Craft for Kids - Cute Clay Pot Pig Craft


Copyright: Please read this Copyright Information about using the images of this website.


© Craftideas.info

Contact     Links     Privacy Policy and Cookies