Free Craft Ideas, Tutorials and Templates


CI Border

Home

Patterns

Tutorials

Spring Crafts

Summer Crafts

Fall Crafts

Christmas & Winter Crafts

New Crafts


Paper Christmas Tree and Evergreen Tree

This craft project is fun for both young and old alike and looks great plain and decorated. A whole forest of trees can be created which also looks really great. All you need for the basic tree is just green construction paper or cardstock, scissors and glue. The tree can be made as large or as small as you like, depending on the size of circles you use. Using decorative edged scissors to cut the circles out, give the tree ends a more realistic look.


Paper Craft for Christmas - Paper Christmas Tree With Bead Garland

For this project you will need:

- green cardstock or construction paper
- scissors
- decorative edged scissors
- craft glue
- paper clips to hold paper while drying
- silver wire and beads if you wish to decorate the tree
- clear tape

The hardest part about making the tree is forming the cone shape. This can be done easier when you first wrap your cut semi-circle around a small cylinder or tube shape item such as a film roll or so. This will help curl the paper to make it easier to work with.

Instructions:

1.Cut out 4 circles in 4 different sizes.If you have decorative edged scissors, use these to cut the circles out. This gives the edge a more realistic look.
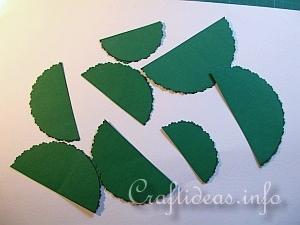
Cut the circles in half 200
2. Cut each circle in half using normal scissors so that you now have eight halves. This is enough for 2 trees.
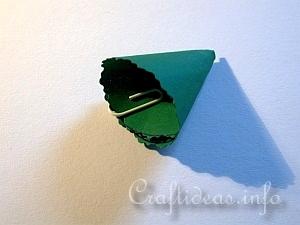
Form a cone 200
3. Form a cone with each semi-circle and glue the side edge. Hold together with a paper clip.
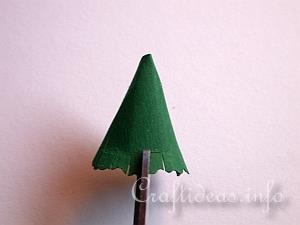
Cut into the tree ends 200
4. Cut into the bottom about 1/4 inch or 7mm from the bottom edge with your normal scissors as seen in the picture below. Do this around the whole bottom edge.
5. Take each of the four sizes and start to assemble your tree. Starting with the bottom, place a dot of glue on the tip. Add the second biggest cone over it, place a dot at the tip and add the next smaller size, and so on. Do this until you have used your last tree part.
6. Let the tree dry.
7. To add decorations, create a garland like this. Take a piece of wire about 20 cm or 6 inches long. Add the first bead 5 cm or 2 inches from one end of the wire. Go with the the other wire end again through this bead to secure it in place. Continue adding beads in this manner at 1.3 cm or 1/2 inch intervals until the garland is long enough. Insert the first wire end through the top tip of the tree and secure it inside the tree with tape if you can. Wrap the garland around the tree and tuck the other end through the bottome of the tree when finished. Secure this end also with tape.


Paper Craft for Christmas - Paper Christmas Tree Craft
The tree is here without decoration.


More Winter and Christmas Craft Themes:

Christmas and Winter Crafts for Kids

Christmas and Winter Paper Crafts

Christmas and Winter Textile Crafts

Christmas and Winter Wood Crafts

Christmas and Winter General Crafts

Christmas and Winter Greeting Cards

Christmas Tree Ornaments

Christmas and Holiday Wreaths

Christmas Craft Patterns

Santa Claus Crafts

Snowman Crafts

Advent Calendars

Gingerbread Crafts

Christmas Projects.com


More Christmas and Winter Paper Crafts

Colorful Stars Window Decoration for Christmas

Paper Snowman Garland

Paper Pieced Snowman Window or Room Decoration

3-D Christmas Tree Project

Snowflake Bookmarkers

3-D Paper Snowman Craft

Stitched Paper Snowman

Paper Roll Santa Claus

Paper Christmas Tree or Evergreen Tree

Corrugated Cardboard Gingerbread Man

Paper Craft for Christmas - Paper Christmas Tree With Bead Garland


Copyright: Please read this Copyright Information about using the images of this website.


© Craftideas.info

Contact     Links     Privacy Policy and Cookies