|

|
|
|
|
|
|
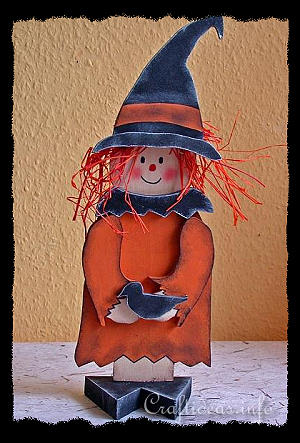
Wilhemina, the Friendly Wooden Witch
Wilhelmina is having a bad hair day but she does not care. She is not entering a fashion show, but instead likes to be a friendly guest on a shelf or window sill around Halloween time. This project has a total of 8 pieces to saw out and is finished within one afternoon.
|
|
|
|
|
Supplies Needed:
- 18 mm thick piece of scrap wood large enough for the shoes
- 8 mm thick wood for the witch body
- 4mm thick piece of plywood for the rest of the figure
- acrylic paint in the following colors: orange, red, white, skin color, brown and black
- drill with 1.5 mm and 3.2 mm bits
- 3.5 cm long and 3.5 mm thick screw to attach the witch to the shoes
- flat and round paint brushes
- wood glue
- standard wood sawing supplies
|
|
|
Instructions: (see picture for placement of elements)
1. Print out patterns so that they fit completely on the standard printer paper size.
2. Transfer the markings to the appropriate thicknesses of wood and saw out. Sand smooth if necessary.
3. Paint the pieces accordingly and let dry. Drybrush the edges and details of the witch, in a contrast color if desired. (Dry brush black with white, skin color with brown and orange with black) This gives the figure a more realistic look.
3. Cut orange raffia out for hair and gather into a bunch. Tie off at the middle of the bunch with another piece of raffia and glue onto the head of the witch. Try to keep the hair as flat as possible so that the hat can be easily glued over it.
4. Glue the hat brim to the hat and then the hat onto the head of the witch.
5. Paint the facial features onto the witch.
6. Glue on the collar, arms and the raven onto the witch.
7. Drill 2 holes in the bottom of the witch legs. Mark the hole positions onto the shoes piece and drill also 2 holes. Screw the shoes base onto the legs.
|
|
|
|
|
|
|
|
|

|
|
|
|
|
|
|
|
Copyright: Please read the information here about the copyright of this website.
|
|
|
|
|
© Craftideas.info
Contact Links Privacy Policy and Cookies
|
|
|