Free Craft Ideas, Tutorials and Templates


CI Border

Home

Patterns

Tutorials

Spring Crafts

Summer Crafts

Fall Crafts

Christmas & Winter Crafts

New Crafts


Snowman with Snowballs for Sale

This snowman won’t just be hanging around this year. He has made a business out of winter with his collection of snowballs.


Christmas Wood Craft - Wooden Snowman - Snowballs for Sale

For this project you will need:

- 2 centimeter thick wood piece for the base
- 1 centimeter thick wood piece for the snowman
- 4 mm thick plywood for the sign and hat
- long piece of Christmas ribbon for the scarf
- assorted sized pressed paper balls
- acrylic paints in the colors red, white, black, light brown, dark brown and orange
- shishkabob stick for the sign post - the length of the stick should be half the height of the snowman
- hot glue gun
- drill with a 3.2 mm bit and a bit that is the width of the shishkabob stick
- wood screws measurnig 35 mm x 3,5 mm
- textured snow paste
- paint brushes in different sizes

Craft Pattern:

Wooden Snowman

Country Snowman


Instructions:

1. Print out the snowman parts and transfer them on the appropriate sizes of wood. The body is cut out of thick pine about 10 mm thick. The hat and the nose out of 4 mm plywood. Cut a 2 cm (h) x 6 cm (w) board the length of 32 cm for the base underneath the snowman. The sign is a rectangle shape measuring approximately 7 x 5 cm. Saw the outside edges in an uneven zick-zack way.
2. Saw and sand down all the pieces. Then paint the snowman, base piece and back piece white. Paint the sign and shishkabob stick brown, the hat black and the nose orange.
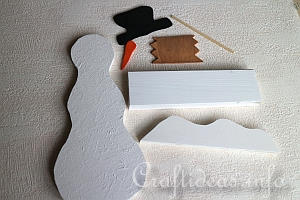
Wooden Snowballs Snowman Pieces
These are the painted pieces awaiting the next step.

3. Add a coat of textured snow paste to the snowman once the white paint has dried. The hat, nose and sign pieces get drybrushed in a contrast color. Here, the nose was shaded with red, the hat with white and the sign with dark brown. Once dried, use wood glue to adhere the hat and nose onto the snowman body.
4. The snowman and the back piece get screwed onto the base. Three screws are needed in total, 1 for the snowman, 2 for the back piece.
5. Using a paint marker or white acrylic paint and a fine paint brush, write “Snowballs for Sale 10 c”.
6. The balls get glued randomly on to the board with the hot glue gun once all other pieces are screwed on. Then a coat of textured snow paste gets brushed onto the balls, parts of the back piece, on the sign and on the snowman hat.
7. Tie a piece of ribbon around the snowman’s neck as a scarf.

Illustrated Craft Tutorials:

Transferring Patterns Onto Wood Tutorial

How to Make Patterns and Permanent Templates

Drybrushing Tutorial

How to Dry Brush Wood

Scrollsaw Tutorial

How to Saw Wood Out Using a Scroll Saw


Wooden Snowman - Snowballs for Sale - Back Side
This is how the backside of the snowman looks like.

Featured at:

All Free Christmas Crafts


More Winter and Christmas Craft Themes:

Christmas and Winter Crafts for Kids

Christmas and Winter Paper Crafts

Christmas and Winter Textile Crafts

Christmas and Winter Wood Crafts

Christmas and Winter General Crafts

Christmas and Winter Greeting Cards

Christmas Tree Ornaments

Christmas and Holiday Wreaths

Christmas Craft Patterns

Santa Claus Crafts

Snowman Crafts

Advent Calendars

Gingerbread Crafts

Christmas Projects.com


More Christmas and Winter Wood Crafts

Miniature Wooden Snowman and Christmas Trees

Winter Wooden Snowman Trio Door Sign

Happy Winter Snowman Door Greeter

Wooden Snowman Decoration

Snowman Tree Ornament

Happy Winter Snowmen Sign

Wooden Snowman and Tree

Wooden Snowman Heart Decoration

Christmas Snowman Shelf Decoration

Snowman Selling Snowballs

Winter Wooden Snowman Door Sign

Winter Wooden Snowman Centerpiece

Happy Winter Snowman

Snowman Wall Plaque

Christmas Wood Craft - Wooden Snowman - Snowballs for Sale 300


Copyright: Please read this Copyright Information about using the images of this website.


© Craftideas.info

Contact     Links     Privacy Policy and Cookies