|
Instructions:
1. Print out the free pattern above to the size you would like your blocks to be. Depending on the width of the lines on the pattern, cut out colorful fabric strips of that width plus 1 cm seam allowance. Alternate the colors for each new addition. That makes the picture interesting and no 2 squares will be alike.
2. Follow the pattern and start with piece #1 and #2. Sew piece #2 onto piece #1. Sew then piece #3 onto piece #1 and then piece #4 onto piece #1.
3. Following the numerical order, keep adding fabric strips to the block until the entire pattern is completely covered.
4. Repeat steps 1-3 for the next 15 blocks.You have now 16 completed patchwork blocks.
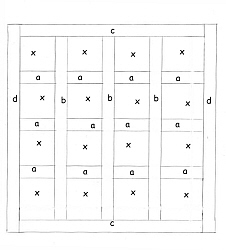
Use the diagram below for assembly of the blocks and strips.
When deciding on the width of the strips, remember to include seam allowance.
5. Piece “a” should be the length of your patchwork block and width of choice. You need 12 pieces. Sew piece “a” onto a finished block. Add another block to piece “a”. Continue until you have a long strip with 4 blocks and 3 strips of piece “a”. Repeat this step 3 more times until all of the blocks and piece “a” strips are used. You have now 4 rows.
6. Pieces “b” should be the same width of piece a. Measure the length of the rows you just completed. That will be the length of the piece “b” strip. Cut three of these and connect the rows now together using a piece “b” strip between each row.
Assembly of the patchwork pieces:
7. Piece “c” is the same width and length of piece “b”. Sew it to the top and bottom of the patchwork piece.
8. Piece “d” is the length of the completed picture once piece “c” has been added on both sides. Add it to the sides of the patchwork picture.
9. Your front is now completed.
10 Measure the patchwork picture and buy or make a frame the size of it. I used strong 2 sided sticky foil to stick it to the frame insert. It is pulled tight to ensure there are no wrinkles. Once it is secure, place the cleaned glass over your picture and assemble your frame.

Assembly Diagram
|