|
|
|

|
|
|
|
|
|
Clay Pot Advent Calendar
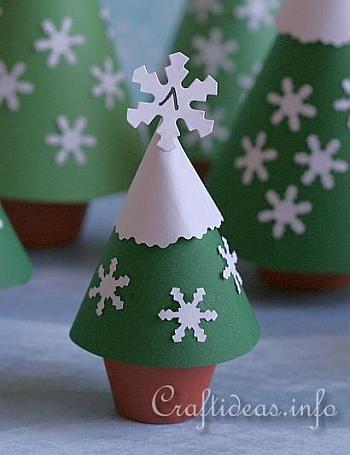
Advent calendars help to count the days until Christmas. Especially it is fun for children to get up each morning and see what hidden “treasure” is waiting for them for that particular day. The “treasures” can vary. You can fill the pots with all sorts of things such as pieces of candy or chocolate, small toys, coins, small collectables or fill even them with a small note saying what activity you can make or play for that particular day. This is a fun and easy advent calendar to make and at the same time it is a Christmas decoration for the shelf or window sill. If you would like, make various sized trees and arrange them to look like a small forest. The filling of the calendars get put into the clay pots and the trees cover these pots. The trees hold quite well onto the pots on their own so you do not have to glue the trees to the pots. They are re-usable year after year.
|
|
|
|
|
For this project you will need:
- 24 mini-clay pots (we used three different sizes for a variety)
- green and white construction paper
- white typing paper
- paper puncher with a large snowflake motifs and a small snowflake
- craft glue
- scissors
- decorative edged scissors (for the white snowy area on the tree)
- pencil
- 2 sizes of cans or bowls to trace around
|
|
|
Instructions:
1. Trace 12 circles out of the green construction paper using different sized plates or bowls. The size you will need will depend on the size of the clay pot you are using plus how big you want your tree to be. Experiment with a couple of sizes to determine what you like. Cut each circle in half. You will then have 24 semi-circles.
2. Trace 12 circles out of the white construction paper using a smaller round object. Cut the circle edges out with the decorative edged scissors instead of straight scissors so that the edges are a bit uneven and wavy. Now cut each white circle in half with the straight scissors.
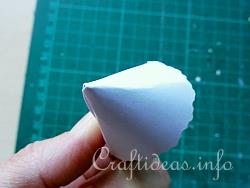
3. Take a green semi-circle and over lap the straight side over the other straight side until it forms a cone shape. Glue the area where it overlaps and use a paper clip to hold in place until the glue dries. Do the same for the white snow top. When both are dry, glue the white top onto the tree.

This image shows the white top area being formed into a cone shape. The tree and this top area get done the same way.
4. Repeat this for the remaining 23 trees.
5. Punch small snowflakes out and glue them onto the green tree part.
6. Punch 24 large snowflakes out. Write the numbers 1-24 on each snowflake and glue each one onto the tree top.
7. Fill the pots with the desired treats and place a tree over each pot.
|
|
|
|
|

Close up of one of the trees
Featured at:

|
|
|
|
|
|
|
|
|
|
|
|
|
|
|
© Craftideas.info
Contact Links Privacy Policy and Cookies
|
|
|