Free Craft Ideas, Tutorials and Templates


CI Border

Home

Patterns

Tutorials

Spring Crafts

Summer Crafts

Fall Crafts

Christmas & Winter Crafts

New Crafts


Wooden Christmas Chalkboard with Santa

Store bought decorated chalkboards can be quite expensive. You can create your own with just a few basic supplies and at the same time have a decorative item for your home or to give as a gift for Christmas. The Santa is a paper napkin design which inspired this project. Because of his size, he is perfect for this craft. Create a 3-D effect using modelling clay and forming the details. Instructions can be found below how to make this project.


Chalkboard with Santa Claus

For this project you will need:

- 10 mm thick plywood for the chalkboard
- 2 paper napkins with large motif covering a quarter of the napkin such as this Santa
- air drying / hardening modelling clay
- rolling pin
- paper napkin applique or decoupage glue
- kitchen knife
- chalkboard paint
- paint brush for glue
- paint brush with paint matching motif
- wood glue
- triangle wood slat the same width as your chalkboard
- drill with bit for drilling holes
- twine for hanging

Instructions:

1. Saw out a piece of wood that is the same width as your paper napkin and at a length you choose. Follow the directions in the paper napkin applique tutorial below to apply a complete napkin quarter onto the top portion of the wood. Let motif completely dry before continuing.
2. Cut a wooden border out and paint it a color matching your motif. Lay aside for the moment.
3. Use masking tape and protect the paper napkin motif along the bottom edge. Paint chalkboard paint on the rest of the wood board and let the paint completely dry.
4. Select a detail of your napkin you wish to use as the 3-D effect. To create the 3-D motif, follow the steps 1-3 in the directions in the modelling clay link below.
5. While the clay is still semi-soft, use the blunt side of a knife and press in details carefully to add a more realistic look to the figure. See picture below for technique.
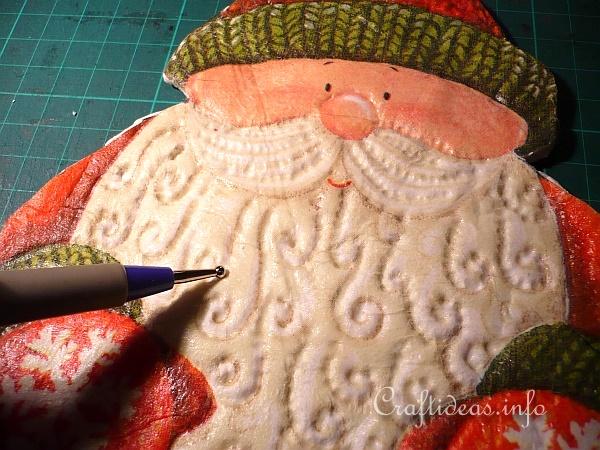
Adding Details

6. Use the wood glue and glue on the wood slat. Lay the prepared 3-D motif slightly over the slat. This motif was perfect with the mittens. Let it dry in this position overnight. The next day, glue the motif now permanently onto the board.
7. Drill a hole in each corner at the top of the board and add twine for hanging it up.

Illustrated Card Craft Tutorials:

Modelling Clay 75

Using Modelling Clay for 3-D Figures

Paper Napkin Applique with Fusible Web Tutorial

Paper Napkin Applique With Fusible Web Tutorial

Scrollsaw Tutorial

How to Saw Wood Out Using a Scroll Saw


Chalkboard with Santa Claus - Details
Detail of 3-D Effect on the Chalkboard - Notice how the added 3-D detail gives the decoration much more depthness and dimension.


More Winter and Christmas Craft Themes:

Christmas and Winter Crafts for Kids

Christmas and Winter Paper Crafts

Christmas and Winter Textile Crafts

Christmas and Winter Wood Crafts

Christmas and Winter General Crafts

Christmas and Winter Greeting Cards

Christmas Tree Ornaments

Christmas and Holiday Wreaths

Christmas Craft Patterns

Santa Claus Crafts

Snowman Crafts

Advent Calendars

Gingerbread Crafts

Christmas Projects.com


More Christmas and Winter Wood Crafts

Wooden Santa with his Sleigh and Reindeer

Father Christmas and Tree

Santa Claus Ornament

Wooden Santa Claus Pin

Merry Christmas Santa Claus

Wooden Santa Heart Decoration

Christmas Wood Craft - Gingerbread Man and Heart Chain

Fresh Cookies Gingerbread Man Sign

Gingerbread Recipe Card Holder

Wooden Santa Garland

Wooden Santa Chalkboard

Chalkboard with Santa Claus


Copyright: Please read this Copyright Information about using the images of this website.


© Craftideas.info

Contact     Links     Privacy Policy and Cookies