Free Craft Ideas, Tutorials and Templates


CI Border

Home

Patterns

Tutorials

Spring Crafts

Summer Crafts

Fall Crafts

Christmas & Winter Crafts

New Crafts


Hen and Eggs Decoration

This proud mother is patiently waiting for her chicks to hatch.After cutting the pieces out and sanding them, they get painted and then drybrushed and speckled to give them a country look.


Woodcrafting for Spring - Hen and Eggs Decoration 1

For this project you will need:

- 4 mm thick plywood
- acrylic paints in the colors of white, red, yellow, dark brown, black and orange
- paint brushes in various sizes
- old toothbrush (for speckling)
- scroll-saw or other saw of your choice
- hay or natural raffia for the grass embellishments
- sandpaper
- wood glue
- drill with small bit for drilling holes to hang
- sturdy wire for hanging
- clear outdoor matt varnish to prevent weathering

Hen and Eggs Template

Craft Pattern: Hen and Eggs Template


Instructions:

1. Print your pattern out so that it totally fits your printer paper. Transfer the markings onto the wood and saw them out.
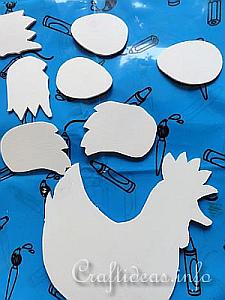
Woodcrafting for Spring - Hen and Eggs Decoration 4
2. Paint all of the pieces first white and let them dry. The white helps the other colors look more brilliant afterwards.

3. Paint the hen comb and wattle red and the beak yellow.
4. Dry brush the edges and the “feathers” of the hen and wing with black paint. To create a feathery look, dry brush the hen body row after row with minimal color and follow the contour of the hen body for the direction of the brushing.
5. Drybrush the comb and wattle edges black and the beak with a mixture of brown, orange and red paint. the eggs get drybrushed with brown paint.
6. To speckle the work, dip a toothbrush into black paint (brown paint for the eggs) and brush your thumb or other finger along the bristles towards your work to cause the paint to slightly splatter. You may first want to practice this technique over a piece of cardboard before trying it out over your hen.
7. Take the end of a round paint brush stick and dip it into the black paint to dot on an eye. When the eye is dry, dot a small white dot in the center of the eye.
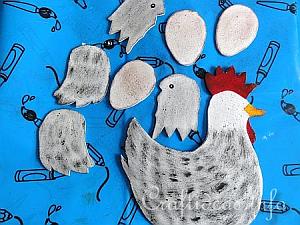
Woodcrafting for Spring - Hen and Eggs Decoration 3
8. Apply a coat of varnish to give the hen a nice matt shine.

This is how the pieces look before assembling them together.

9. Now glue on the face and wing to both sides of the hen. Glue grass at the bottom of the hen and then glue on the eggs over the grass. Let the glue dry before continuing.
10. Determine the hanging center of the hen so you will know where to drill the hole for the wire. This center is not exactly in the middle of the hen, but is the area where the weight of the hen will be distributed the same on on both sides. On this hen, it was close to the neck area.
11. Once this center is determined, drill a hole and insert a wire for hanging.

Illustrated Craft Tutorials:

Transferring Patterns Onto Wood Tutorial

How to Make Patterns and Permanent Templates

Drybrushing Tutorial

How to Dry Brush Wood

Scrollsaw Tutorial

How to Saw Wood Out Using a Scroll Saw


Spring Wood Craft - Sitting Hen Wall Decoration

Woodcrafting for Spring - Hen and Eggs Decoration 2
A few speckles and a little drybrushing gives the hen a more realistic appearance.


More Spring Season Craft Themes:

Spring and Easter Paper Crafts

Spring and Easter Wood Crafts

Spring and Easter Textile Crafts

Spring and Easter General Crafts

Spring and Easter Crafts for Kids

Spring Season Greeting Cards

Valentine’s Day Crafts

St. Patrick’s Day Crafts

Easter Crafts

Easter Chick Crafts

Decorating Easter Eggs

Easter Bunny Crafts

Mother’s Day Crafts

Spring Craft Patterns

Nature Crafts

More Spring Season Wood Crafts:

Wooden Flowers Decoration

2012 Wooden Centerpiece

Wooden Letter “H” Monogram

Wooden Letter “B” Monogram

Wood Slice Refrigerator Magnets With Birds Motifs

Door Sign With Fence, Bird and Flowers

Hen and Eggs Decoration

Hen and Rooster in a Patchwork Look

Woodcrafting for Spring - Hen and Eggs Decoration


Copyright: Please read this Copyright Information about using the images of this website.


© Craftideas.info

Contact     Links     Privacy Policy and Cookies