Free Craft Ideas, Tutorials and Templates


CI Border

Home

Patterns

Tutorials

Spring Crafts

Summer Crafts

Fall Crafts

Christmas & Winter Crafts

New Crafts


Paper Napkin Decoupage - Wooden Angel Heart Decoration

This cute angel can decorate your own home or be created for a special friend or loved one. This project combines wood sawing, paper napkin applique and working with modelling clay. It is quick and easy to craft but you will need to let the clay dry overnight.


Wooden Heart with 3-D Angel Motif - Paper Napkin Applique Decoupage 400

For this project you will need:

- 6mm thick plywood for the heart
- 2 paper napkins with similar to the example napkin below or other motif of choice
- air drying / hardening modelling clay
- rolling pin
- paper napkin applique or decoupage glue
- kitchen knife
- paint brush and paint matching motif
- paint brush for glue
- wood glue
- drill with bit for drilling holes
- twine for hanging

Heart Paper Napkin Designs
The paper napkin used for this project has four completely different motifs and inspires one to create four of these hearts right away. That way you will have a couple of last minutes gifts on the side if you need them.

Instructions:

1. To create the heart decoration, follow the directions in the paper napkin applique tutorial link below. You need one complete napkin quarter to apply to the wood. Let motif completely dry before continuing.
2. Saw the heart out and paint the edges with a matching color.
3. Select a detail of your napkin you wish to use as the 3-D effect. To create the 3-D motif, follow the steps 1-3 in the directions in the using modelling clay for 3-D figures tutorial in the link below.
4. While the clay is still semi-soft, use the blunt side of a knife and press in details carefully to add a more realistic look to the figure. See picture below for technique.
5. Let the clay motif dry overnight. The next day, glue the motif permanently onto the heart.
6. Drill a hole in each top heart half and add twine to hang it up.
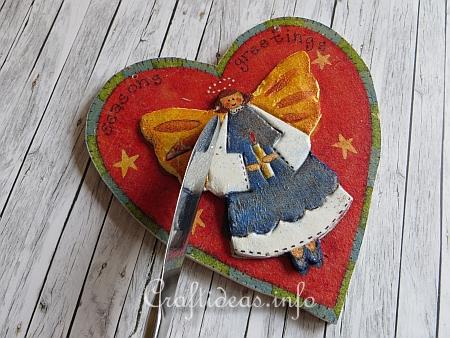
Pressing the details of the angel on the clay
While the clay is still semi-soft, use the blunt side of a knife and press in details carefully to add a more realistic look to the figure.

Illustrated Card Craft Tutorials:

Modelling Clay 75

Using Modelling Clay for 3-D Figures

Paper Napkin Applique with Fusible Web Tutorial

Paper Napkin Applique With Fusible Web Tutorial

Scrollsaw Tutorial

How to Saw Wood Out Using a Scroll Saw


Details - Heart Angel in 3-D Technique 330
3-D Detail of the angel - It really looks dimensional with the clay addition.


More Winter and Christmas Craft Themes:

Christmas and Winter Crafts for Kids

Christmas and Winter Paper Crafts

Christmas and Winter Textile Crafts

Christmas and Winter Wood Crafts

Christmas and Winter General Crafts

Christmas and Winter Greeting Cards

Christmas Tree Ornaments

Christmas and Holiday Wreaths

Christmas Craft Patterns

Santa Claus Crafts

Snowman Crafts

Advent Calendars

Gingerbread Crafts

Christmas Projects.com


More Christmas and Winter Wood Crafts

Scandinavian Style Wooden Glitter Ornaments

Wood Burned Christmas Ornaments From Wooden Branch Slices

Natural Christmas Tree Ornaments Crafted From Wooden Branch Slices

Winter Welcome Chalkboard

Plant Pokes or Plant Sticks With Christmas Animal Motifs

Christmas Wood Craft - Christmas Tree

Moose and Sleigh Advent Calender

Lighted Wooden Christmas Trees

Wooden Noel Decoration

Simple Wooden Christmas Trees Decoration

Wooden Stocking Ornament

Wooden Winter Mittens

Sparkling Star Christmas Tree Ornament

Scottie Christmas Tree Ornament

Wooden Country Cottage Decoration

Wooden Swedish Cottage Decoration

Christmas Recipe Card Box

Wooden Angel Heart Wallhanging

Wooden Bird Heart Wallhanging

Wooden Heart with 3-D Angel Motif - Paper Napkin Applique Decoupage


Copyright: Please read this Copyright Information about using the images of this website.


© Craftideas.info

Contact     Links     Privacy Policy and Cookies