Craftideas.info - Halloween Crafts

Home

Patterns

Tutorials

Spring Crafts

Summer Crafts

Fall Crafts

Christmas & Winter Crafts

New Crafts


Wine Cork Witch

This witch is not interesting in scaring the children at Halloween but would rather have a nice spot on a shelf. Kids will have fun making her out of wine cork and other basic craft materials. This project needs a little bit of time to dry, but is otherwise a fast and easy craft.


Halloween Craft - Wine Cork Witch


Supplies Needed:

- wine cork
- black, flesh and red acrylic paint
- 5mm white wooden bead (for the nose)
- pair of 6mm wiggly eyes
- 25 mm round styrofoam of pressed paper ball
- 2 soft orange feathers
- black chennile
- black construction paper
- tooth pick
- natural colored raffia
- hot glue gun (parents or supervisors should assist the children when using a hot glue gun) - or use strong craft glue as an
  alternative for younger kids
- black fine liner marker
- paint brushes

Ages 10 and older

Instructions:

1. Paint the cork black and set aside to dry.
2. Paint the styrofoam or paper ball in flesh color and set aside to dry.
3. Create a witch hat by following the instructions above in the step-by-step pictures.
4. Glue the wiggly eyes on the face.
5. Be careful for this step. Use scissors and “cut” the wooden ball in half. This is done by placing the scissors over the middle over the hole and pressing down. This will split the wooden ball in half.
6. Paint the wooden ball with the flesh color and set aside to dry.
7. Dry brush the cheeks with red paint. This is done by dipping a stiff brush in the paint and wiping the paint off onto a paper towel until almost no more paint comes off the brush. Then pounce the brush onto the cheeks. Continue until the intensity you want is achieved.
8. Use the fine liner marker and draw a mouth onto the witch.
9. Glue the head onto the body body.
10. Glue one orange feather onto the side of the face so that the soft part of the feather is facing down. Cut away excess feather at the top of the head.
11. Now do the same with the second feather.
12. Glue the hat onto the head.
13. Glue the nose onto the face.
14. Glue a piece of chennile from the backside of the witch at the neck line so that the chenille ends are at the front.
15. Create a broom by gathering a few pieces of raffia together. Tie off at one end. Place a drop of glue to one end of the toothpick and insert it into the bundle at the tied off end.
16. Hot glue the broom to the witch’s hand.

Instructions for the witch hat:

Witch Hat 1a
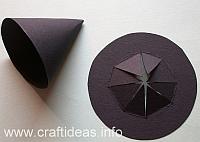
1. To make the hat, print out the patterns. Form the a cone out of the half circle shape. Cut the dotted lines on the circle shape.
Witch Hat 2a
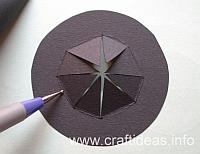
2. Take the stylus and score the space between the “pie” pieces.
Witch Hat 3a
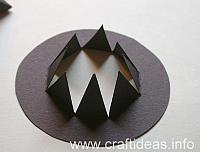
3. Bend the “pie” pieces upwards.

Witch Hat 4a
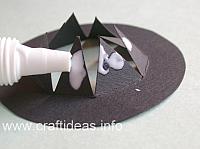
4. Place glue on the outside of the pieces and then place the cone shape over these. Press these pieces inside of the cone and let dry.
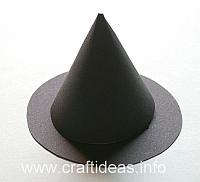
Witch Hat 5a
5. This is how the finished hat looks and is ready to use for the witch.


More Craft Themes:

Fall Paper Crafts

Fall Crafts for Kids

Fall Textile Crafts

Fall General Crafts

Fall Wood Crafts

Autumn Season Cards

Halloween Crafts

Thanksgiving Crafts

Leaf Crafts

Pumpkins and Jack o’ Lanterns

Fall Craft Patterns and Templates

Halloween Craft - Wine Cork Witch

A Selection of Halloween Kids Crafts

Halloween Art - Paper Mosaic Jack o' Lantern

Easy Jack o’ Lantern Can Decoration

Paper Machè Glass Pumpkin

Recycling Crafts with Cans - Frankie the Friendly Frankenstein Monster

Wine Cork Witch

Wine Cork Fairy

Pom-Pom Jack o’ Lantern

Pom-Pom Black Cat


Copyright: Please read the information here about the copyright of this website.


© Craftideas.info

Contact     Links     Privacy Policy and Cookies